Search This Blog Post

Symphony B2i Flash File

Symphony B2i Flash File


Info:

MTK_ROMINFO_v08TELACOM50M_11B_PCB01_GSM_MT6250_S00 .TL_K1750MU2092_F03LK7A_00_00

Flash Type SF_W25Q32BV

Flash ID: 00EF0040

ChIP capacity: 3 Mb


Password: Mosh@rof Telecom


DOWNLOAD

How to recover lost data for iPhone 4S after upgrade to ios6

  • Part 1: Recover Lost Data Directly from iPhone 4S

    In this mode, you can directly scan your iPhone 4S to retrieve data lost because of accidental deletion.
    Step 1. Connect your iPhone 4S with your computer

    Connect your iPhone 4S with your computer with data cable, and then launch Wondershare Dr.Fone (iPhone 4S). You’ll see an interface as below.

    Step 2. Select “Recover from iOS Device” mode

    Here your device name will be displayed. Click “Start” and then Dr.Fone will analyze your iPhone 4S.
    The analyzing time depends on the data amount inside your device. You just need to wait for the end of device analysis.

    Step 3. Scanning data of your iPhone 4S

    When the analysis completes, Dr.Fone will automatically scan your iPhone 4S.

    Step 4. Preview found data and recover files selectively

    After the scan, all found contents in your iPhone 4S will be listed in categories, including “Contacts”, “Messages”, “Notes”, “Call History”, “Safari Bookmarks”, “Reminders”, etc.
    You can preview all of them one by one so as to check whether they are what you want to retrieve or not.
    Then you just need to select files you need and click “Recover” to save them on your computer.

    Note: Wondershare Dr.Fone (iPhone 4S) currently does not support directly recovery of “Camera Roll”, “Photo Stream”, “Photo Library”, “Message Attachments” and “Voice Memos”. Plus, all existed files will be detected and displayed. You can click “Only display the deleted items” to hide the existed data.
    Part 2: Recover Previous Data from iTunes Backup

    This recovery mode allows you to recover your previous data by extracting iTunes backup. You can use this recover mode to find your previous data that you failed to directly recover from your device, or you lost your device.
    Step 1. Select iTunes backup file to scan

    When launching the program, you’ll be lead to the "Recover from iOS Device" mode (the default mode). Switch to “Recover from iTunes Backup File”.

    Here, all your iTunes backup files of your iPhone, iPad or iPod touch which has ever synced with iTunes on this computer will be automatically found and listed. Select the one of yours and click "Start Scan" to begin iTunes backup extracting.
    Step 2. Preview and recover previous data

    After the scan, all your data backed up by iTunes can be found and displayed in categories. You can preview them one by one before recovery.

    • Then you can selectively mark and recover those you want by pressing "Recover" button at the bottom.
      Note: Don't sync your device with iTunes when you realize that you've lost data, or the iTunes backup file will be updated after the sync, if you want to recover them through this recovery mode.

Recover iPhone,iPad,iPod lost data from iTunes Backup Files

  • Recover Lost iPhone Photos, Contacts, Messages and More from iTunes Backup Files

    Lost a lot on your iDevice after a sync or system update,Recover contacts, SMS, calendars, notes, call records, voice memos, etc,you can Recover camera roll including videos and photos taken with iPhone/iPad,Wondershare Data Recovery for iTunes Work perfectly for iPhone 5/4S/4/3GS, iPad 2/1, the New iPad and iPod touch 4


    Notes: If you are a Mac user,you can give a try to theiPhone&iTunes Data Recovery for Mac . It also works in easy steps to recover your iPhone data directly,or recover data from the backup file on your Mac.

    First, 
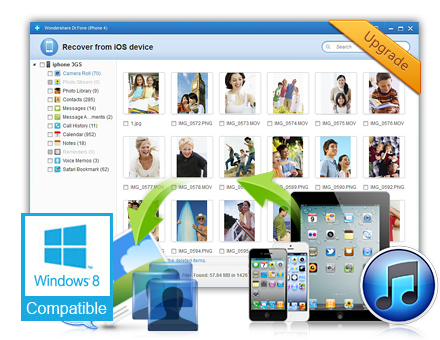
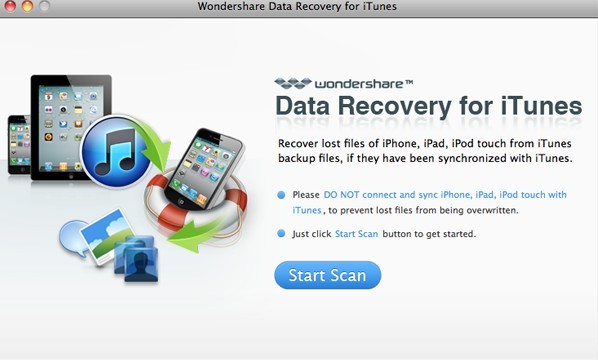
Free download ITunes data recovery Mac,and install and run the program on your Mac.
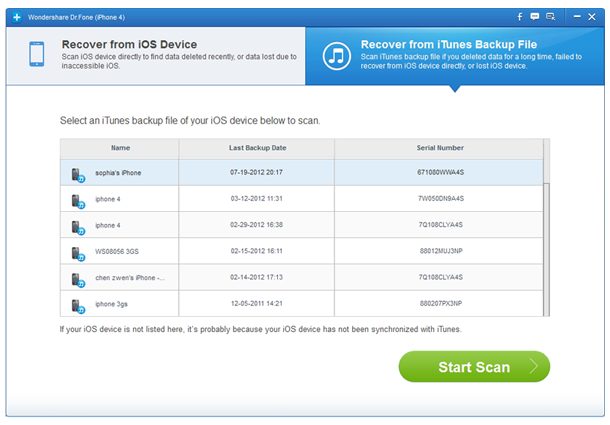
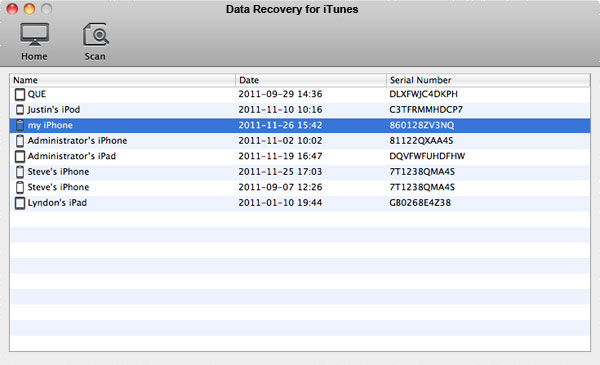
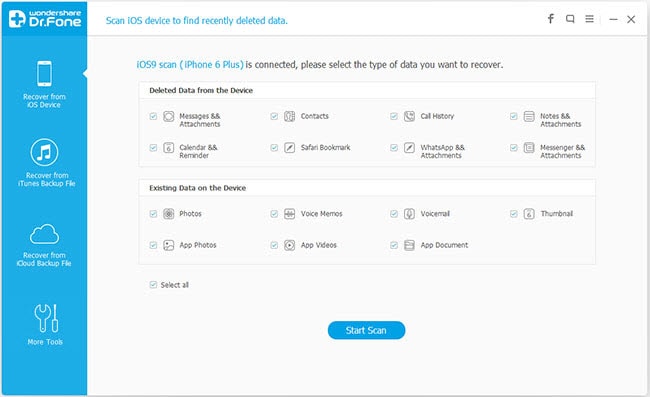


    Step 1: Scan iTunes

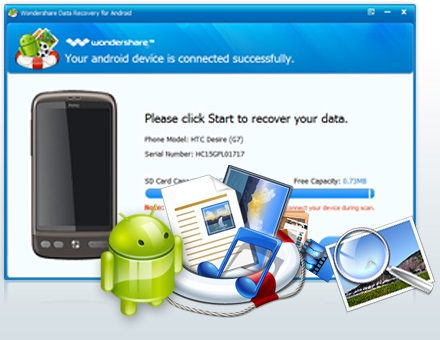
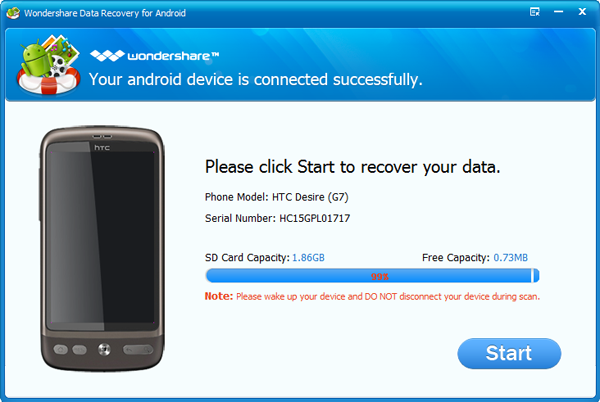
    After install launch the software and in the Home window click “Start Scan”. This will bring you to a list of all the devices that are synced with your Mac’s current copy of iTunes. Highlight a device by clicking it and then click Scan.


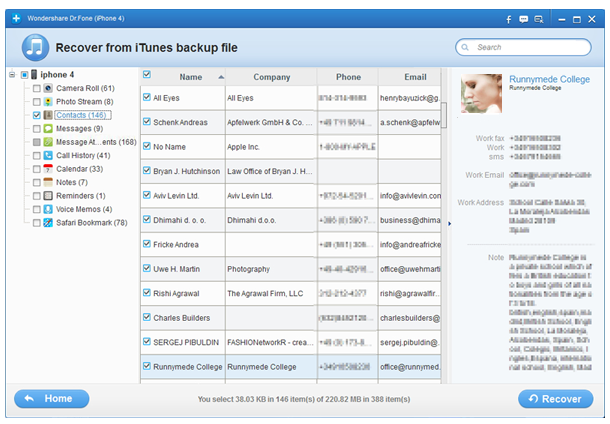
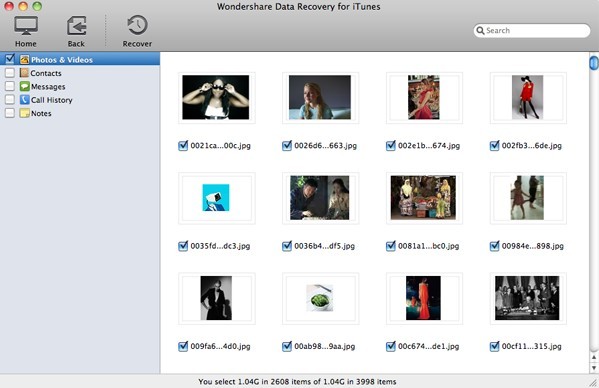
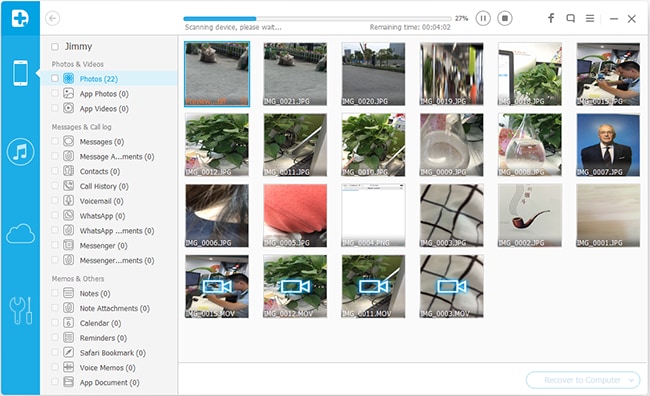
    Step 2: Preview and Select

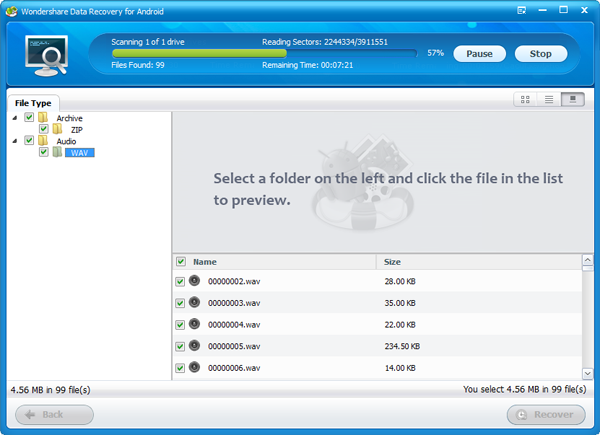
    After you click Scan, you’ll immediately be able to view thumbnails of all media files previously synced to iTunes from that device. Browse these files by category (Photos and Videos, Contacts and Notes) by clicking one of these three options on the top left of the window.
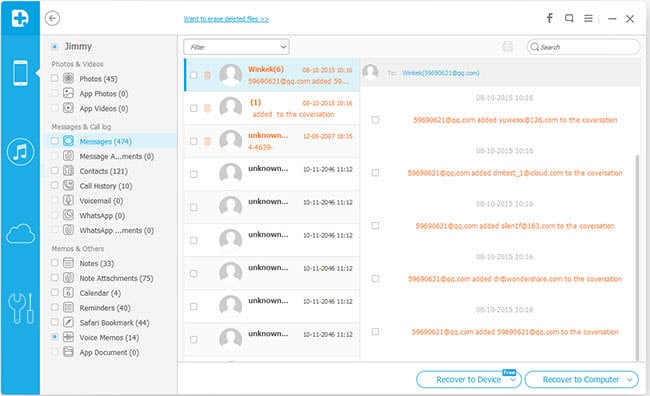
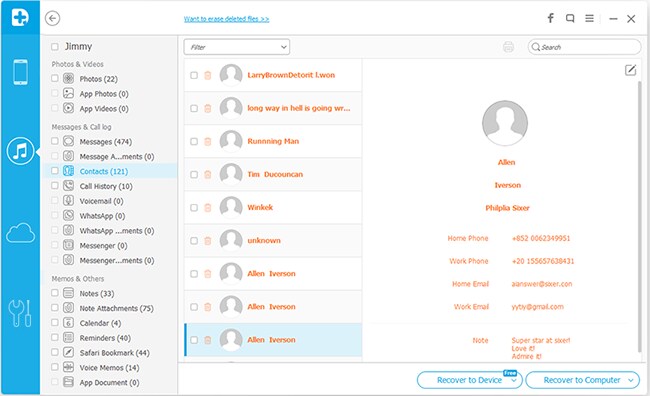


    Custom Select

    Select one at a time by checking the individual boxes located under each thumbnail, or select all files in a category (Contacts, for example) by checking the box next to each category in the top left.
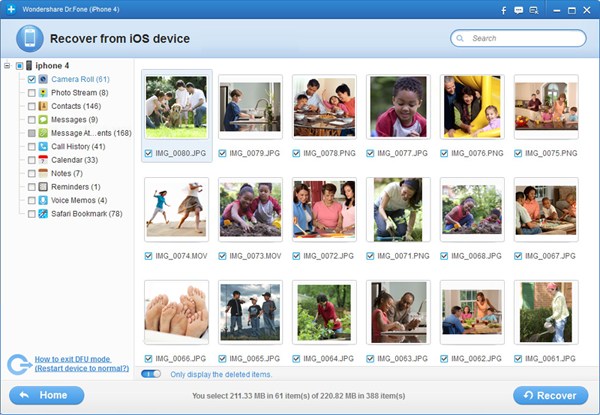
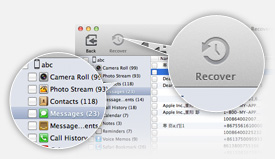
    Step 3: Recover Your Files

    After you’ve completed selecting all the files you want to recover, just click Recover in the menu bar next to the Back button (Actually recover is not allowed in the free trial version). At the Save prompt, you’ll be asked to name and select the destination folder for your recovered files (Desktop, for example). Your file will export immediately to the location you specified. Now you’re all done. Simple, right? To scan, view and recover files from another device, just click the Back button. Enjoy your reclaimed photos, videos, and more!

How to Recover All Lost Data from iPhone 5


  • Below is step by step guide on how to rescue lost iPhone 5 files under a Windows based PC . If you are a Mac OS X user, please turn to iPhone&iTunes Data Recovery (for Mac) for the tutorial.


    If you are a Mac user, then you can give a try to theiTunes Data Recovery for Mac . It also works in easy steps to recover your iPhone data from the backup file on your Mac.

    STEP 1 : Download and install the app on your PC. Run it and the software main interface will be seen as below. If you have synced different iOS devices with iTunes before, then all the backup files will be listed out. Just choose your iPhone 5, and hit the "Start Scan" button to move on.


    STEP 2 : After the scanning, all found items will be displayed in details. You can read the content right now and you also can preview the contacts,messages,photos, videos, songs in advance.

    Recover iPhone lost Contacts


    Recover iPhone lost Photo


    STEP 3 : To recover desired iPhone 5 files, check the box in front of the items and hit on the "Recover" button, then save them to a destination of your computer.

How to backup all iphone files to Windows computer?

  • Step:1 Free download Cucusoft iPhone Tool Kits

    For Mac: Free download iMacsoft iPhone to Mac Transfer

    Connect iPhone to computer after installing the iphone backup software. The software will automatically detect it and will show the lst of file from the iPhone.


    Step:2 Choose the files you want to take backup and click on export button.


    Step:3 After you click Export button, the under given window will pop up, you can choose either backup to computer or itunes directly. You can set the output folder at Advanced->Options before you transfer


    Step:4 When backup is finished a window will pop up displaying message as 'export finished' after which you can see it from the location stored in.


    So easily backup all your iphone files to computer now.

    For Mac: Free download iMacsoft iPhone to Mac Transfer

Recover Android Lost Data-recover HTC, Samsung, LG, etc.


  • Step1. Download Wondershare Android Data Recovery and Connect Android to computer


    Directly connect your Android phone to the computer with a USB cable, without needing to take the SD card out of the phone. When it appears as a hard disk on your computer, the program will detect it as follow.


    Step2. Scan lost data


    After connecting the Android phone to the program, click on the "Start" to find out all lost data from the SD card on your Android.


    Step3. Preview and check


    All recoverable data are categorized as different file types, such as archive, audio, graphic, video, etc. You can preview the photos in original quality, and check the other files one by one.

    Step4. Recover


    Check the single file or the whole file type that you want back, and click on the "Recover" to save on your computer.

    System Requirements
    • Supported OS: Windows 7/Vista/2000/XP (32/64bit)
    • File System: FAT16, FAT32, exFAT, NTFS
    • CPU: 1GHz and above
    • RAM: 512 MB or more of RAM
    • Disk Space: 1G and above
    All Formats and Android Devices Supported
    File types supported Photo JPG, TIF, TIFF, PNG, BMP, GIF, PSD, CRW, CR2, NEF, ORF, RAF, SR2, MRW, DCR, WMF, DNG, ERF, RAW, etc. Video AVI, MOV, MP4, M4V, 3GP, 3G2, WMV, ASF, FLV, SWF, MPG, RM, RMVB, etc. Audio MP3, M4A, WMA, MID/MIDI, WAV, AIF, AIFF, OGG, AAC, etc. Document DOC, DOCX, XLS, XLSX, PPT, PPTX, PDF, CWK, HTML, HTM, INDD, EPS, etc. Email PST, DBX, EMLX, etc. Archive ZIP, RAR, SIT, etc. Recover data from all types of Android devices HTC phones: myTouch 3G Slide, Flyer, Inspire 4G, Sensation (G14), Wildfire S (G13), Desire S (G12), Incredible S (G11), etc. Google Nexus One, Google Nexus S Samsung: i9100, Ace S5830, GT-I9000, Droid Charge, Tab P1000, GT-P7500 Sony Ericsson: Xperia X10, X8i(E15i), X10i, LT15i Motorola Milestone, Motorola Defy(ME525) LG P970, LG Optimus 2X ZTE Blade V880 HUAWEI U8800, HUAWEI U8220, HUAWEI S7 Slim Acer Liquid metal S120, Acer iConia Tab A500 Asus A10, Asus Eee Pad Lenovo lephone MEIZU M9 and other Android devices File system supported FAT16 FAT32 exFAT NTFS

All Mobile Solution Headline Animator

Please Log in