VolcanoBox 2.4.0 MTK safe Format - Solve MTK6235+64M - Added SPD ADB ROOT & Much More
MTK safe Format,added MT6235 Unlock
Solve MTK6235+64M Write Flash bug
Added SPD ADB ROOT new phones support
Adjust SPD Android backup factory file(ADB Backup)
SPD Android added new flash support
Samsung Galaxy Ace II GT-I8160 Restore Factory Hard Reset Remove Pattern Lock It will remove all the data ,contacts and apps that you installed Before Performing The Hard Reset:
- In Case Your Samsung Mobile Phone Can Connect To A Computer Then It Is
Better To Make A Backup Of Your Saved Data Using Samsung Kies
Software.
- But In Case That Is Not Possible Then You Can Check That Your Phone’s
Battery Has Enough Charging, Otherwise You Should Charge It. Samsung Galaxy Ace II GT-I8160 Hard Reset Steps:
- Take Out Your Phone’s Battery, SIM-card And Memory Card Too.
- After 10 Seconds Put The Battery Back Into Your Phone.
- Press And Hold Volume Up Key + Home Key Then Press Power Key.
- Keep Pressing The Above Keys Until Samsung Logo Appears,Then Release All Keys.
- You Will Get Factory Reset / System Recovery Menu On Screen.
- Use Volume Down Key To Select Wipe Data / Factory Reset Option.
- Use Home Key To Confirm The Operation.
- You Need To Use The Volume Down Key Again To Select "Yes — Delete All User Data"
- Use Home Key To Confirm.
- After Performing The Hard Reset, Select Reboot System Now Option, And Confirm It Using Home Key.
- Now The Phone Will Reboots, Wait For It To Be Fully On And Then You Can Start Using It. Notice: The Hard Reset / Factory Reset Operation Will Delete
Anything That Are Saved In Your Phone’s Internal Memory, So Make A
Backup Of Your Data In Case You Can Access Them.
Samsung Galaxy Ace II GT-I8160 Restore Factory Hard Reset Format
Phone.So lets start the Samsung Galaxy Ace II GT-I8160 Restore Factory,
Samsung Galaxy Ace II GT-I8160 Hard Reset.Turn Off the mobile phone
for few mints.Samsung Galaxy Ace II GT-I8160 Remove Pattern Lock.
After installing bad or unsupported application into your Samsung mobile phone which causes your phone to be frozen.
– Your Samsung mobile phone doesn’t respond to any order after booting because of some software errors.
– Forgotten pattern lock in Samsung Android mobile phones.
– Forgotten user code.
– Forgotten phone code.
– Before or after installing new firmware updates into your device.
– Before selling the device to Wipe all your saved data.
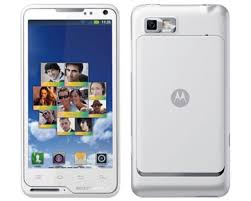
Motorola Motoluxe Xt615 Hard Reset Keys:
1.Power Off Your Phone
2.Press Together Volume Up + Volume Down + Power Button Until Motorola Logo Appears
3.Press Home Key To Enter In Recovery Menu
4.Select With Volume Buttons "wipe Data" And Press Power To Confirm
5.Select "yes" And Press Power To Confirm
6.Press Power To Confirm "reboot"
7.Wait Until The Phone Restarts
Notice: The hard reset operation will delete anything that are
saved in your phone’s internal memory, So make a backup of your data
in case you can access them.
Motorola Motoluxe Xt615 Restore Factory Hard Reset Format Phone.So
lets start the Motorola Motoluxe Xt615 Restore Factory, Motorola
Motoluxe Xt615 Hard Reset.Turn Off the mobile phone for few
mints.Motorola Motoluxe Xt615 Remove Pattern Lock.
If you want nokia 110 network solution. This post will help you a lot.In this post a diagram is attached that will show you how to repair
network problem in nokia 110.
In this post you can see all Nokia Asha 302 Antenna Connectors tracks.
1st antenna connector X4000 marked with Red jumper passes through Z4003,
C4006 then connects to X4003 and passes through R4004 finally connects
to C4005 & C4004. The 2nd X4002 and 4th X4004 are both ground. The
3rd antenna connector X4001 passes through Z4006 and connects to X4006.
If speaker is not working in Nokia asha 305. We can not hear a voice call.Noise in ear peace speaker or low voice
problem can be solve with this post.Read carefully all these tips and
follow diagram that is given bellow to solve speaker problem solution
in Nokia asha 305.
In above diagram you can see red and blue lines.These lines are tracks
and paths that are used in speaker function in Nokia asha 305. So check
all these parts with meter and if any of them is missing apply
jumper.You can apply jumper at points that are shown in diagram for
repairing speaker problem solution.
If Nokia asha 305 touch screen is not working we can not type with
it.Although nokia asha 305 have also keypad but touch screen is easy to
type fast. To solve touch screen problem of nokia asha I am posting this
post that also have a diagram.
The above diagram contains some different color lines these are used for
nokia asha 305 touchscreen function.You can find out if there is some
rust carbon in it. Mother board can be water damage or may be you find
out some burn parts in it.
If you are facing nokia 110 charger not supported problem you can solve
it with this diagram. The repairing diagram for nokia 110 not charging
is given bellow in this post. It has some blue and red color lines these
lines are given so that you can easily find out main parts that are
used in charging function in nokia 110.
Find out parts that are given in above diagram and check them with
electronics meter if you find any part missing or damage replace it. You
may can apply jumpers as two different color lines are identified.
Nokia 110 have two sim jacks and if you have problem of nokia 110 insert sim 1 or insert sim 2. You can find out the solution in bellow diagram.
It may can be cause of water damages or burning parts.
In above diagram you can find some different color lines. All these
lines are given to show tracks and paths to make jumpers if any of them
is missing.You can check these tracks with meter and if any of them is
missing apply jumpers as shown in above insert sim repairing diagram.
f 1,4,7 keys are not working in nokia 110 then you can fix this keypad problem with diagram bellow. In this diagram you can see a capes-tor.
This part can become short due to water damages and may cause for nokia
110 keypad problem.
In first step try to make it clean with electronics cleaner and apply
hot air so that it can be dry. Do not apply much heat because it can
harm your skin and may can damage the mother board.
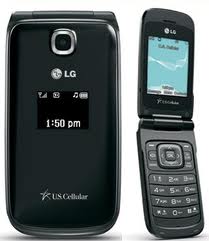
LG
Envoy II User U.S. Cellular – U.S. Cellular LG Envoy II was released in
March 2013, and it is a simple flip phone with mediocre camera.Design
with black plastic and monochrome secondary display LG Envoy II for U.S.
Cellular . One thing that is a plus, LG Envoy II offer easy to use, but
the lack of understanding for microSD memory could be spreading.
II for U.S. Cellular LG Envoy equipped with specifications and key
features like: 99 x 51 x 18 mm in size with weight 104 g, 2.20 inch TFT
capacitive 256K colors 176 x 220 pixel internal display and 0.98 cm 2
MSTN monochrome 96 x 64 pixel external display, 129 MB internal memory,
pre-loaded games UNO, Bluetooth 2.1 + EDR, 1.3-megapixel main camera,
Li-Ion 950 mAh battery, standby time up to 300 hours and talk time up to
5 hours.
LG Envoy II User Manual for U.S. Cellular Owner Help explaining the
features and functions in PDF format and contains 101 pages, 1.0 MB. At
U.S. Cellular LG Envoy II User, the user statement EasyEdge app on page
46 and UN app can be found on page 66
LG Envoy II user manual,LG Envoy II user guide manual,LG Envoy II
user manual pdf,LG Envoy II user manual guide,LG Envoy II owners
manuals online,LG Envoy II user guides,
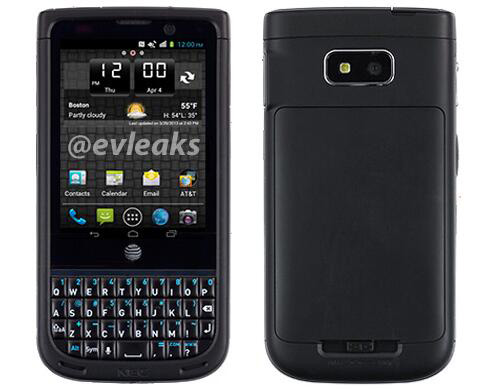
NEC
field manual for AT & T – NEC site for AT & T was released on
June 2013 QWERTY keyboard on the range in the color black. NEC site for
AT & T is the first phone on the U.S. market by the manufacturer.
Nec grounds to support push-to-talk feature phone for AT & T’s 4G
LTE network and is comfortable to hold with rounded edges and soft
design for mini headphones.
NEC grounds with the specifications and key features like: 127.5 x
64.5 x 14.5 mm in size with 172 g weight, 3.1 inches TFT capacitive
touchscreen 16M colors 640 x 480 pixel display with shockproof,
waterproof, dustproof and Corning Gorilla Glass 2 protection, microSD up
to 32GB, 8 GB internal memory, 1 GB RAM, 5 megapixel rear-facing camera
with autofocus and LED flash, 0.3 megapixel front camera, run Android
4.0 Ice Cream Sandwich OS, Having dual-core processor 1.5GHz Qualcomm
Snapdragon S4 MSM8960 Adreno 225, Li-Ion 1900 mAh battery, standby time
up to 348 hours and talk time of up to 10 hours.
NEC field manual for AT & T is available in PDF format that
contains 97 pages download. NEC field manual for AT & T is an
improved push-to-talk service and function declaration for users, such
as: better application ptt, outgoing calls, calls are subject to
availability and Enhaced push-to-talk settings.
NEC Terrain user manual,NEC Terrain user guide manual,NEC Terrain
user manual pdf,NEC Terrain user manual guide,NEC Terrain owners
manuals online,NEC Terrain user guides,
Download Alcatel One Touch Idol User Guide Manual Free
Alcatel
One Touch User Idol – Alcatel OneTouch idol was published in 2013
low-end smartphone May, but came with a large screen and good quality of
the call. Alcatel One Touch bad idol come without 4G speeds, so it is
3G smartphone but surprisingly the device with Android 4.1 Jelly Bean is
available, which is the users of the data usage tracking, and Google
Now hotspot function.
Alcatel One Touch idol with the specifications and key features such
as: 133 x 67.5 x 7.9 mm in size with 109 g weight, 4.7 inch IPS LCD
capacitive touchscreen 16M colors 540 x 960 pixels screen with
multi-touch and Dragon Trail glass protection, microSD up to 32GB, 1 GB
RAM, 4GB internal memory,front-facing camera 2 megapixel , 8-megapixel
rear-facing camera with autofocus and LED flash, run Android 4.1 Jelly
Bean OS that 1 GHz dual-core processor powered MTK 6577 +, Li-Ion 1800
mAh battery, standby time up to 410 hours and talk time of up to 3
hours.
Alcatel One Touch idol user manual is in PDF format and contains 153
pages. About Alcatel One Touch idol manual in the chapter most of your
mobile users will lead to information about ONE Touch Manager and One
Touch Upgrade tool for upgrading your phone from your computer.
Alcatel One Touch Idol user manual,Alcatel One Touch Idol user guide
manual,Alcatel One Touch Idol user manual pdf,Alcatel One Touch Idol
user manual guide,Alcatel One Touch Idol owners manuals online,Alcatel
One Touch Idol user guides,
if you are facing not charging problem in nokia x101 it can be solve in a few easy steps.Let we diagnose it before solving the
problem.Insert charging pin into the mobile phone’s charging base and
check the notifications on screen.
If it shows nothing on the screen it may can be cause of charger or it
can be due to charging pin damages.While if it shows not charging on the
screen it can be the problem of charging ic and parts.
As in above diagram you can see some parts inline with red color to
solve nokia x101 charging problem. Look at the above diagram and in it
follow steps given on the diagram.
nokia c5 only vibrate no power on problem can be cause of water damages.
So after disassemble clean the whole mother board and apply hot air to
make it dry. Do not apply much hot air to because it may can harm your
skin and damage the board.
In the above diagram you can see a resistance remove this if only
cleaning the board can not solve nokia c5 only vibrate no power on
problem.
nokia 1280 white lcd light problem nokia 1280 white display solution
nokia 1280 white display 1280 white lcd solution nokia 1280 lcd whit
disply salosin nokia c101 whitdisply solution nokia 1280 white lcd
solution nokia 1280 blak lcd solution Nokia 1280 white screen problem
1280 display solution nokia 1280 lcd white display
here is a diagram that will solve display problem in nokia 103 you can see all the links in diagram that goes to board from lcd jack.check all
these prints and tracks with electronics meter and if any of them is
broken make jumpers as shown.all these links are indicated with
different colors so that can be identified easily.
nokia 1280 not charging problem solution 1280 not charging nokia 1280
charging solution nokia 1280 charging ways nokia 1280 not charging
problem solution Nokia 1280 not charging jumper nokia 1280 no light
problem solution new track ways nokia 1280 charging not save nokia 1280
charging ways jumper nokia 1280 notcharging Nokia 1280 not charging
sulotion
so check all these parts that are indicated in this diagram and also
check these links with an electronics meter and if you found any of them
broken make these jumpers and also you may have to change these parts
if not working with upper tricks.
nokia 1280 led lcd light solution nokia 1280 light ic jumper nokia 1280
light jumper nokia 1280 display light solution nokia 1280 light jumper
solution nokia 1280 display light problem solution nokia 1280 light
problem solution nokia 1280 display ic 1280 light problem nokia 1280
display ic nokia 1280 lcd light
Nokia 1280 led lcd display light solution jumpers ways.in this diagram
all links and ways are defined with different colors so that can be
identified easily so check all these link with electronic meter and if
any or them is broken make these jumpers to solve light led display
problem in nokia 1280 .
nokia 1280 mic ways nokia 1280 mic jumper nokia 1280 signal solution
nokia 1280 network solution nokia 1280 network problem nokia 1280 keypad
nokia x2 mouth piece jumper nokia 1280 mothpiece solution Nokia 1280
mouthpiece jumper nokia 1280 mic problem solution nokia 1280 network
problem solution
if mic microphone is not workin in nokia 103 you can solve this problem
with these cellphone jumpers that are defined in this diagram attached
with this post.just look at the diagram and check these links that are
defined in it.
Nokia 1280 Battery Terminal Points Damage nokia 1280 battery
connector ways nokia 1280 battery connector ways nokia 1280 battery connector Nokia 1280 battery connecter track Nokia 1280 battery ways
solution Nokia 1280 terminal way solution Nokia 1280 battery connector
track nokia 1280 battery terminal jumper nokia 1280 terminal point Nokia
1280 battery empty problem
Nokia 1280 Battery Terminal Points Damage Ways Problem Solution if in
nokia 1280 during changing battery terminal points you have loss
battery points then you can solve this problem with this diagram bellow
posted in this post.
nokia 1280 insert sim solution nokia 1280 insert sim solution nokia 1280 sim ways nokia 1280 sim not validnokia 1280 sim solution nokia 1280
signal problem nokia 1280 signal problem solution nokia 1280 power ic
nokia 1280 sim 1280 insert sim jumper way 1280insertsimsolution
if you have insert sim problem no sim or sim not valid problem in nokia
1280 cellphone here is a diagram that is attached with this post look at
the cellphone diagram and see there are different colors lines that
define ways of sim in nokia 1280.
if you are facing nokia 100 mic problem. and want to solve it with
jumpers. Nokia mic problem solution jumpers are given in this post. In
this diagram you can see two different color lines.
Red color and blue color lines are given as tracks of mic ways. Check
these path and apply jumpers if any of these links is missing.
After you have changed the mic and check these mic prints and ways mic
problem will be solve easily.This diagram will help you to solve nokia
100 mic problem solution.
Nokia 101 lcd light problem solution can be solve by applying these
jumpers. Light problem in Nokia 101 can be cause of water damages.
as you can find a few different color tracks you have to check these
track with meter to solve nokia 101 lcd light problem solution. if any
of them is missing apply these jumpers as given in above diagram to
solve light problem in nokia 101.
As most of mobile phones have six point of sim card. In all sim cards
sim jack use five prints that are used in sim function. As in given
bellow diagram you can see different color lines. These lines are
identifying sim point of nokia 101.
Check all these points and track with meter and if any of these prints
are missing apply jumpers to solve nokia 101 insert sim solution. Once
you have check and apply these sim point jumpers insert sim problem of
nokia 101 will be solve easily.
Nokia 100 101 LCD Display Solution Jumper Ways,Nokia 100 101 LCD Display
Solution By Jumper,Nokia 100 101 LCD Display Solution,Nokia 100 101 LCD
Display Problem.All these display problems can be cause of water
damages, carbon and burn parts.
Parts may have been damaged. Keep checck all these tracks that are given
in above diagram to solve display problems in nokia 100. If you find
out missing parts replace them and if any tracks is not working then
apply jumpers as shown in diagram.
nokia 101 local mode solution can be solve with a few easy steps that I
am going to post in this article. Keep looking the diagram also that is
given bellow in this post.
As in diagram you can see a few resistances in lined with red color.
Check these if you find some carbon rust or water damages in it. Make
them clean with electronics cleaner and apply heat so that it can be
dry. This will help you to solve nokia 101 local mode, nokia 101 test
mode problem solution.
You may have to replace these if it can not be solve by cleaning.
Nokia 101 Ear Speaker Buzzer Jumper Solution Ways,Nokia 101 Speaker
Solution,Nokia 101 Speaker Ways,Nokia 101 Speaker Jumper,Nokia 101
Speaker Problem Repair. All these problems can be cause of water
damages, carbon or rust.
Burn parts can be the reason of all ringer problems in it. So keep
looking at the diagram above and look all these parts on the mother
board find out water damages and make it clean with electronics cleaner.
Check all these tracks with meter and if any of them is missing apply these jumpers as given in above diagram.
Nokia 101 LCD Display Solution Jumper Ways,Nokia 101 LCD Display Solution By Jumper,Nokia 101 LCD Display Solution,Nokia 101 101 LCD
Display Problem.All these display problems can be cause of water
damages, carbon and burn parts.
Parts may have been damaged. Keep check all these tracks that are given
in above diagram to solve display problems in nokia 101. If you find
out missing parts replace them and if any tracks is not working then
apply jumpers as shown in diagram.
Acer
Liquid C1 User Manual – Acer Liquid C1 was Intel’s Lexington to easily
learn to March 2013 based platform and continue to share. Acer Liquid C1
with plastic and Intel Inside logo can be found on the back of the
smartphone. Acer Liquid C1 is performed supported by Android 4.0 Ice
Cream Sandwich, but is absent with 4G LTE.
Acer Liquid C1 equipped with specifications and features like: 127.3 x
65.5 x 10 mm in size with 140 g weight, 4.3 inch IPS LCD capacitive
touchscreen 16M colors 540 x 960 pixel display with multi-touch support ,
microSD up to 32GB, 4GB internal memory, 8 megapixel rear-facing camera
with autofocus and LED flash, a VGA front camera, Android 4.0 Ice Cream
Sandwich running the operating system, powered by 1.2 GHz Intel Atom
processor Z2420 PowerVR SGX540 and Li-Ion 2000 mAh battery.
Acer Liquid C1 manual is available in PDF format, 57 pages, contains
5.4 MB in size. Acer Liquid C1 user manual helps the user with the
settings and start fast information also provides explanations of
smartphone features and functions.